Write It in White!
I’ve been getting into pen & ink lately, a surprise even to myself – a heretofore devout and exclusive pencil enthusiast. A friend passed on some beautiful Rotring Art Pens – a fountain pen created for drawing! It just took the right tool to get me hooked. I’ll save those for another post, but using the pens in a Fabriano Artist’s Journal, filled with several colors of Fabriano’s Ingres pastel paper, gave me the itch for a nice white to stand out with my black and brown fountain-pen inks against those colorful journal pages (in Googling for a Fabriano Artist’s Journal link for you, I’m only coming up with journals filled with cream/white sheets, so this multicolor version of the journal may sadly no longer be available).
JetPens.com was kind enough to read my mind and send along an opaque white Sakura Gelly Roll gel pen for review, so I ordered a couple of friends for it, also from JetPens. Test-driving new writing materials is always fun, and this was no exception.
The Gelly Roll is .4mm medium point; its two new friends are both Mitsubishi Uni-ball Signo gel pens – the Angelic UM-120AC .7mm and the Broad UM-153 (the point size is not specified on this one, but as you can guess from the name it’s a great broad point). All are described by Jet Pens as being great for artists and crafters.
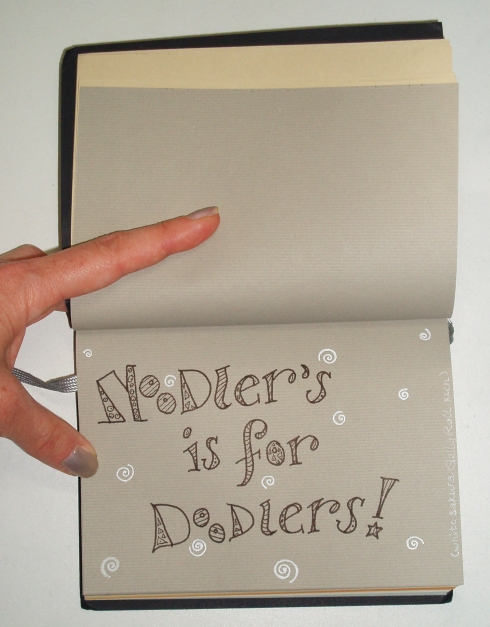
From the initial test run, I am happy. Not thrilled, but the gel pens definitely performed to their gel-pen utmost, as far as I can tell. Gel pens usually have that “track” down the center of every mark they make – the structure of the pen is such that the little ball in the tip distributes a bit more ink to the sides of each stroke than in the stroke’s center, so in a white pen one sometimes sees a darker streak down the center of each mark. This is a minor quibble, inherent in gel pens from what I can tell, and not a drawback for sketchbook work – just something to consider if one is producing fine art.
For comparison’s sake (upper right in the photo above), I used stipple, a quick sketchy stroke for opaque coverage, and line to see how the three pens stack up. The Uni-ball Signo Broad (bottom pen pictured) has both the widest, whitest line and most reliable ink flow of the three. It starts more quickly than the other two and covers most opaquely. The Uni-ball Signo Angel (middle pen pictured), with it’s .7mm point, trailed the Gelly Roll (top pen) in opaqueness, but has the advantage in reliable start and coverage in the sketchy line department. The Gelly Roll started out very well, but did give me some attitude after writing for a little while with it – you can see in the sketchbook shot above how in most of the white swirls it’s pretty opaque. Toward the end of that run (lower left swirl and more noticeably in the text at page right), the pen just started to quit on me. I was able to get it back to full, opaque flow with some fiddling, but don’t yet know if this is a nasty habit or just a fluke from a new pen.
All in all, I will definitely be exploring more uses for these, both art and craft. All kind of applications come to mind, from the ability to address dark, colorful envelopes to adding highlights to pen & ink drawings on a spectrum of paper colors. At the very least, they are quite portable and will get a workout with my lovely new fountain pens and colorful sketchbook.
Disclaimer: I have no connections to Jet Pens outside of being a satisfied customer. They’re a long-time fave of mine, and not just because they can read minds. They make some excellent, otherwise-hard-to-find art toys available at reasonable prices with excellent service.
You’re Invited: Celebrating Colored Pencil Show
Come see the show! You are invited to the opening reception of the Colored Pencil Society of America‘s Seattle District Chapter‘s 20th anniversary show, Celebrating Colored Pencil, a juried exhibition of color pencil art. The show runs October 19 – December 10 at Semantics Gallery in Edmonds, WA.
Please join me at the reception, Sunday October 23, from 1 – 4pm, or come see the show during regular gallery hours and/or during the October or November Edmonds Third Thursday Art Walks (dates and hours listed in the image below).

I am honored to have one of my pieces, Another Man’s Treasure, among those chosen for the exhibition.
The Importance of Art Friends
If at all possible, surround yourself with art friends on a regular basis. A gathering once a week (or more often if you and your pals can swing it) encourages growth in so many ways. Bring your project(s) in process, share, critique, and work on your art together if you can make enough time. The input of other artists can take your work places you may never have thought of yourself, save you from putting days or months of work into a piece with a flaw (that’s otherwise obvious only to everyone else until it’s too late) and just help you tighten up your work in innumerable little ways. I have been blessed to be a part of a couple of terrific weekly art groups, gatherings of friends with making art as a common interest, for a few years now. We get together to draw, paint, craft, critique, socialize, commiserate, and grow as artists and friends each week.
After I’ve looked at a project for oodles of hours, and can no longer see it even remotely objectively, my art friends are there with their excellent critical eyes and valuable input, pointing out that my piece needs, say, a little more here and a little less there. They’ve added so much to the drawings I’ve completed – from their friendship and support to their artistic insights. Just knowing that I will be seeing everyone for next week’s gathering helps me to focus and work on my piece in the interim.
Insight, the graphite & color-pencil piece I shared with you in the last post, received an award from the Lynnwood Arts Commission Saturday morning during the reception for their In the Red show. Thank you, thank you, thank you to all of my smart, talented, patient, helpful and wonderfully supportive art friends who gave me their honest two cents and helped make it an award-worthy drawing, and another big thanks to all of the super members of the Arts Commission of Lynnwood, WA, for putting on such a lovely show and reception!
Shameless Plug: Upcoming Show
One of my drawings will be displayed at the Lynnwood Arts Commission’s juried group exhibition, In the Red, from September 26 through November 17. My artist friends Barbara Freeman, Eden Hopkins, Paula Parks and Sheila Theodoratos will also have wonderfully red pieces on exhibit.
The show is open to the public at the Lynnwood Library Gallery, 19200 44th Ave. W in Lynnwood, WA, and you’re all invited to the opening reception and awards ceremony Saturday, October 1, from 11am – 12pm at the library. Hope to see you there!
At Long Last … a Web Site!
Those of you who have known me for a while may know that I have had a URL fermenting on my back burner for some time now. I have FINALLY distilled it into a full-blown web site, www.BlueSeahorseStudio.com! I feel it’s only fair to add the disclaimer that I’m no genius web-master, and it’s still a work in progress, but it’s a vast improvement over no web site at all. Yay!
So I’ve not forgotten you all, and should be back to my usual semblance of regular postings this week, now that the web site is at least close to complete. You’re all welcome to stop by and visit the Studio!
The Corner Box: for Still Life, Photography, Etc.
I’ve received a few inquiries about just what it is that I am using for a background in the blog photos. It’s a corner box, a terrific and inexpensive little creation I learned about from teaching artist and author Margaret Davidson. I have been using them for setting up still-lifes for drawing, but they also make great backdrops for photographing art toys!
Here is a quick how-to for creating your own corner box.
Materials:
- Foamcore sheet
- Box-cutter knife
- Cork-backed ruler or T-square (24” is a convenient size)
- Strong or removable artists’ tape
- Recommended: a piece of cardboard or a cutting mat under your foamcore to protect your work surface
Creating Your Corner Box:
- Start with a sheet of foamcore, roughly 22 x 28” in size (size is not critical – a larger sheet will yield a larger corner box, a smaller sheet a smaller box)
- Draw dividing lines in pencil sectioning the sheet into four quarters
- Using your ruler as a guide for your box knife, cut completely through one quarter and remove that section
- Cut the remaining quarters about halfway through the foamcore, fold the two side flaps up to form a corner box, and tape the spine (use removable artists’ tape if you’d like to fold your corner box down again for storage)
- The uneven edge can be trimmed off if you like
- That leftover quarter piece may be used as a lid to help control the lighting in your corner box, or further divided to make a smaller corner box

Here's your corner box with the "lid" resting on top to screen light
Using Your Corner Box:
- These are very helpful for reducing visual background noise and controlling the lighting on your subject.
- They can be lined with colored paper or draped in fabric to change the background from light to dark (or to a particular color) to better view your subject.
- To keep your subject steady, a small amount of poster putty will tack it in place.
- Once your subject is in place, tracing the object’s shadows right onto the foamcore (in pencil, so you can erase and reuse) allows you to record your lighting setup should the corner box or your light source shift during use, or if you need to put your setup away between uses.
IMO: Supporting Your Local Art Store
Although I long suspected and half believed that I could not draw, I had always wanted to learn. Having signed up for a beginning drawing class years ago, I was in a small panic — I had a list of supplies to buy and didn’t know what half the items were. At that time, I had no art friends, art knowledge, art books or art resources — I didn’t even know anyone who drew or painted. A great photographer friend with an art-school background explained some of the basics and pointed me toward a local art-supply store. I think I learned to draw despite that class, and part of my success can be attributed to the patient, helpful staff at that store, especially Mike — one of the people who encouraged me to keep drawing, learning, experimenting and improving when I was starting out.
Mike drew and painted beautifully, knew a great deal about the media he worked in and many others besides. He held a full-time job and spent many of his evenings and weekends working part-time at the store. He was generous with his knowledge of and passion for creating art, and eager to share his enthusiasm with other artists, even the most inexperienced beginners. I could bring questions about materials, composition, my current drawing, or just about anything art related to the store on a slow night, and Mike took the time to offer patient help with whatever it was I was stuck on.
Since then, art stores have expanded their services to bring more people in — many offering classes, workshops, gallery space, scanning and printing services, some even providing a community area where artists can gather to share social and creative time. These stores have taken a beating in the past few years — competition from big-box craft stores and internet-based art suppliers, a difficult economy and higher fuel costs (translating to higher shipping costs for store stock) have eroded profits and driven many out of business.
I do enjoy catalog and online shopping, and can often find more of what I want in a single place, sometimes at more competitive prices than at the brick-and-mortar stores. That online bargain isn’t so sweet, though, when I have questions about the art materials, or need something pronto and waiting a week or more won’t do. I don’t want to be without the option of walking into a local store, connecting with other artists and checking out the art materials in person (not to mention finding those serendipitous items there in the store that one can’t quite live without). For that reason, I buy my supplies locally, ordering online only when I can’t find something around me. Without that local art store years ago, and the assistance and encouragement of Mike and the other staff, I might not need art supplies today.
There are many Mikes out there; you’ve probably met some. They’re helpful, knowledgeable, patient and eager to share their passion for art, but you won’t find them at an online supplier or big-box store. If you are fortunate enough to have an art-supply store in your area, please consider buying local — not only are you supporting a community business and the jobs it provides today, but you’ll help them to be there for you and future artists tomorrow.
Shaving Brushes for Artists
As you will see over the course of my posts, I look for portability in my art materials. I am VERY blessed with some terrific art friends; we gather a couple of times a week to make art together. In addition, I teach and take art classes a few times a year. Between the classes, gatherings of friends and the occasional outdoor sketching venture, I find it very handy to have a couple of art bags stocked with with supplies and sketchbooks at the ready. Even if you don’t take your art on the road, smaller stuff just takes up a lot less space; I’ve never known an artist who couldn’t use a little more room in their domain.
Silver Lead Mop Brushes and Judikins Color Dusters fit the need for a dust brush that’s quite petite and portable. In addition, the brush-head area on these is diminutive as compared to a drafting brush, so if you need to remove dust from a small area without disturbing the surrounding drawing (take note, graphite users), these are much easier on your art. I keep both on my drawing table, and one or the other in each of my drawing bags – something to remove eraser crumbs, pencil sharpening bits and random dust from art in progress.
 Silver Lead Mop Brushes come in a set of six assorted colors
The Silver Lead brushes are recommended for use as paintbrushes by very young children and people who have difficulty gripping a smaller, traditional brush handle. Stamping enthusiasts may recognize the Color Dusters as a tool to apply a small area of stippled-looking stamp-pad ink. Both work beautifully as inexpensive, very portable dust brushes.
 Judikins Color Dusters are available singly and in packs of four
Both brands use hog bristles in the brush, and shed a few bristles when they’re new – nowhere near enough to affect the use of the brush, and it does stop after they’ve been used a bit.
The Silver Lead Mop Brushes can be found very inexpensively on Dick Blick’s web site* (under $5 for a set of 6 – split ’em with a friend). The Color Dusters are available at stamping & crafting stores (the Judikins company has helpfully provided a “Where to Find Color Dusters” web page, and prices for a set of four vary by store – usually $4 – $6); I’ve also seen them for sale on eBay.
*Dick Blick posts special offers on their home page and on a Special Offer page on their web site; always check for the day’s discount before placing an order!
Erasers With a Point
For artists with precisionist tendencies, the Tombow Mono Zero erasers are an essential tool. Ever tried to carve an eraser to a point with an Xacto knife to erase that tiny little spot? These render such efforts unnecessary. The petite points on these white elastomer “click” eraser pens are available in a rectangular eraser point of 2.5 x 5mm and an extra-fine round-point eraser 2.3mm in diameter. Having used these for a few months now, I find them indispensable for small, precise erasures.
 At about 12 cm/4.75″ long, they’re light in weight and quite portable – great for tucking one of each into your mobile art bag or pencil case, and they don’t take up much space on the drawing table.
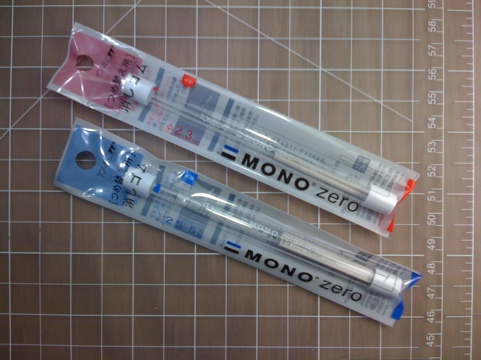
Tombow Mono Zero eraser refills come two to a package. Unlike some of their larger eraser-pen counterparts, the refills are inserted through the tip of the pen instead of the top.
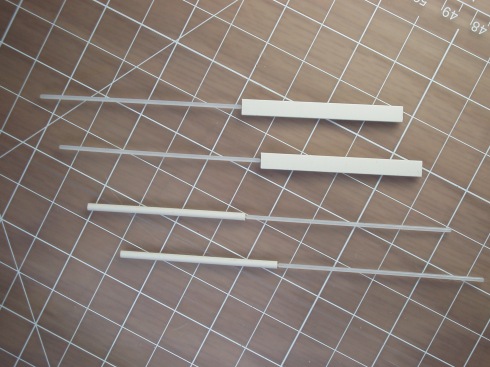 The eraser part of the refill is about 5cm long, and comes attached to a plastic post that fits into the clutch mechanism of the eraser pen.
I’ve found these eraser pens and their refills at JetPens.com and ArtSupplyWarehouse.com. Jet Pens offers free domestic shipping on orders over $25, a total not difficult to reach with their excellent selection of writing and art toys! The Mono Zeros are difficult to find in the brick-and-mortar world (at least around me), so I suggest picking up a few eraser pens with refills when you do buy them.


